Tuesday, 19 February 2013

Barcelona Lasalle Tournament 2013


Barcelona 2013

After a brief spell playing FOG N we decided to return to playing Lasalle. Four of us from Alicante made the long road trip to Barcelona to play in the the Lasalle Tournament. This time we played two games instead of three but with two supports. Personally I feel playing with two supports works the best for games, giving you more options to balance a game.
 
The Participants were:
 
French & Allies

Paconey: Div Inf Imperial+ Light Cavalry and reserve Saxon Cavalry (Despertaferro)
Javi: Div, inf. Conquest+ Light Cavalry and reserve Dragoons (Desperta ferro)
Anquises: Div. inf. Imperial+ Inf. Elite and reserve Cuirassiers (CROM)
Juanete: División de inf Conquest+ Light Cavalrygera and reserve Cuirassiers (Club Alea Iacta Est)
Caboeloeyen: Frances Peninsula +Inf. italian and reserve  Dragoons (A. napo)
Marechalde saxe: Div. Polish 1813+ lancers 1813 and  reserve  Dragoons fr. (A.napo)

Coalitión & Friends

Nº13: Avantgarde Austrians + infantry y reserve cuirassiers (taifa)
Keioth: Avantgarde Austrians + hussars y reserve cuirassiers (Honor y Gloria)
Ngash: Russian Guard+ cuirassiers and reserve Light Cavalry (Wargames & Rol)
Bollito: Prussian liberación+ Light Cav + reserve Cuirassier (Desperta ferro)
Koza: British Light div. + Brig. Brunswick and reserve Light Cavalry (Honor y Gloria)
Phil: British Light div + Brig. Brunswick and reserve Light Cavalry (Wargames & Rol)

My first match was against Eloi with his French Peninsular Division with an organic Italian Brigade and reserve Dragoon Brigade.

For the first time in a tournament I used my British Army, I decided to use Peninsular Light Division with an organic Brunswick Brigade and in reserve my Light Cavalry Brigade (Impetuous of course).

There was some special rules for the tournament, one was that there were 4 extra objectives one placed on each players flank but nearer the middle of the table than the players actual edge and a central objective placed in the middle of the table worth 2 points.

All of the six tables were laid out similar to the ones in the book but each side was a mirror image of the other, so each sides terrain was equal to the others. Each player had to place their objective and one player had to be the attacker, only to see who would deploy first and also the defender could place one extra piece of terrain. 

I was planning on being the defender for the games but due to the objectives being forward of the deployment zones I choose to attack. Eloi choose to defend so there was no need to roll. 
 

Eloi's French Army Deployed

Eloi Deployed his infantry in the centre covering his objective. Instead of mixing his conscript and veterans into two commands he kept them seperate with his conscript brigade covering his left flank.


My British army ready to attack

I used my artillery to cover my left flank and my main infantry Division was going to attack his centre and my Brunswick Brigade was to support the main attack on the right flank.


With being the attacker, my brigades advance quickly in march column

 
The French deploy their foot battery to fire on my advancing large units. 

 
My forces unit's form columns of attack as they begin to pass the town in the centre 

 
On my left flank my cacadores get ready to drive a unit of french irregulars out of the wood.

 
My Cacadores clear the woods and I capture his right flank objective. My Highlanders break an Italian Infantry unit but my Rifle Regt have been pushed back and are countercharged by two Italian units and are broken. So much for Captain Sharpe and Harper.

 
I feel better when my cavalry appear on my right flank. Now my Brunswickers can attack.

 
In the centre things are not going that well, although my Scottish Regt attacks and routs another Italian regiment and is in sight of the main objective. It has become surrounded by 5 French Dragoon Regiments because the French reserves have appeared.

 
The Italians start to press in the centre and I have to bring up some reinforcements to shore up the line.

 
Meanwhile my cavalry start to gallop around the French left flank.


My Scottish regiment forms square and waits for reinforcements, the Brunswickers are close but the sneaky French have unlimbered a horse battery and are firing cannister into the Scottish ranks.
 
 
Unfortunately the Brunswick are too late and the Scots are charged on both sides by cavalry and infantry.


To the shout of "avenge zee Jocks" My Brunswicker's charge the French conscripts and drive them back. Also my British cavalry charge and ride over a conscript square.


Some French Dragoons try to flush my irregular infantry out of the woods but in true Robin hood style, I move my unit forward and  gives them the slip.


                                The French Dragoon unit backs up to have another go.


But as my Brunswick and cavalry push through the French left flank and destroy another conscript unit. The French have arrived at their breakpoint and the game ends with a Decisive victory to me.
With capturing all the objectives, I get 33 points and after the first round I am in  first position.

 
We stop for lunch and go to the same pizza restaurant as last year and catch up with old friends Paco and Javi from Palma Mallorca.
 
After lunch and due to the competition running late, the organisers decide to play the next round with each player choosing one support. I wasn't too happy with this decision because a) the British army doesn't work well with only one support b) I had just spent 3 weeks painting my new Brunswick Brigade and now I wouldn't be able to use it.
 
Due to my poor Spanish I compounded the issue by thinking my next opponent was pulling a fast one by choosing French light cavalry which was not on his original list. It finally dawned on me that the player I should have played had not turned up and I was playing Marc and Oscar who had kindly filled in at the last moment with his Bavarian Army. I would like to extend my apologises once again to Jose Ma, Oscar and Marc for me behaving like a "burro".
 
The table was set out as a crossroads with very little terrain, therefore I elected to be the defender. I used for my extra piece of terrain a narrow hill (ridge) that I had bought with me and was in very high demand (Jose used the other one I had bought and Miguel asking to use this one). 

 
The Bavarian Infantry advanced in march column, whilst the French Cavalry advance onto my open left flank.
 

                                 My British cavalry brigade evenly face their rivals

 
I charge with all my cavalry units, My opponent does not try to fall back but just accepts the combat, As often happens my first unit loses and is forced back, but my other units fare better and the French lose two units. 

 
Five Bavarian Infantry advance in typical Lasalle close order columns, My infantry units advance onto the ridge and pour volleys on to the dense mass before them.


My cavalry break the two remaining French cavalry units and now my plan is to fall onto the Bavarian Infantry Rear.


My Infantry retire behind the ridge and a British Infantry Reg charge the flank of the Bavarian attack force that have been weakened by the previous volley and rout it. The Bavarian-French Army has now reached breaking point and it has only reached turn 7.


This is where my new secret weapon the narrow hill comes into action. Because my troops have retreated behind the hill the Bavarians can not charge or fire at them even though they are in range because they could not initially see them. The Bavarians climb the heights and I pour another volley into them and then charge.

 
As always with my dice rolling,  not everything goes to plan and I lose two combats but break another enemy unit.

 
I countercharge once again and break another unit, now there are only two Bavarian units left surrounded by five British Infantry units and with my cavalry now bearing down on his rear. The Bavarian-French Army is defeated and have lost 8 units whilst my British Army hasn't lost any.
 
Even though this was an easy victory, I still had to play it right because if it ended to soon then I might not have broken enough units to gain enough points to win overall. Also I was aware that time has a way of going quick and if he kept on rolling over his turn number and we run out of time then the game could end in a draw. As it was I just beat Salva to the top prize with us both having two decisive victories each but I had the most points.


Me still in shock at winning receiving my prizes from Oscar and Jose Ma.

 
Salva receiving his prizes for coming second.

 
Juanete receiving his prize for coming 1st out of the French Commanders


                   Team Alicante at the end of the day with Jose Ma and one of the sponsors from Bandau Wargames.

Once again this was a very fruitful and enjoyable day which we will be hoping to repeat next year. I thought the rules for playing with two supports (objectives etc) were very good and it was a pity we couldn't play another game with the two supports in the afternoon. Maybe it would have been better to have kept it to the the normal 16+ turns instead 20+. A Big thanks goes out once again to the organisers and also the Sponsors for supporting the event.

There were a lot more demostration Napoleonic games going on during the day which you can see pictures of at http://www.facebook.com/media/set/?set=a.274000196063710.64392.100003611960669&type=1

One of the guys playing from Seville (numero 13) anounced on the stage that they would be organising a Lasalle Tournament in the  next couple of months time. So a roadtrip to Sunny Seville look like its on the books.


Sunday, 20 January 2013

Battle of Naseby 1645


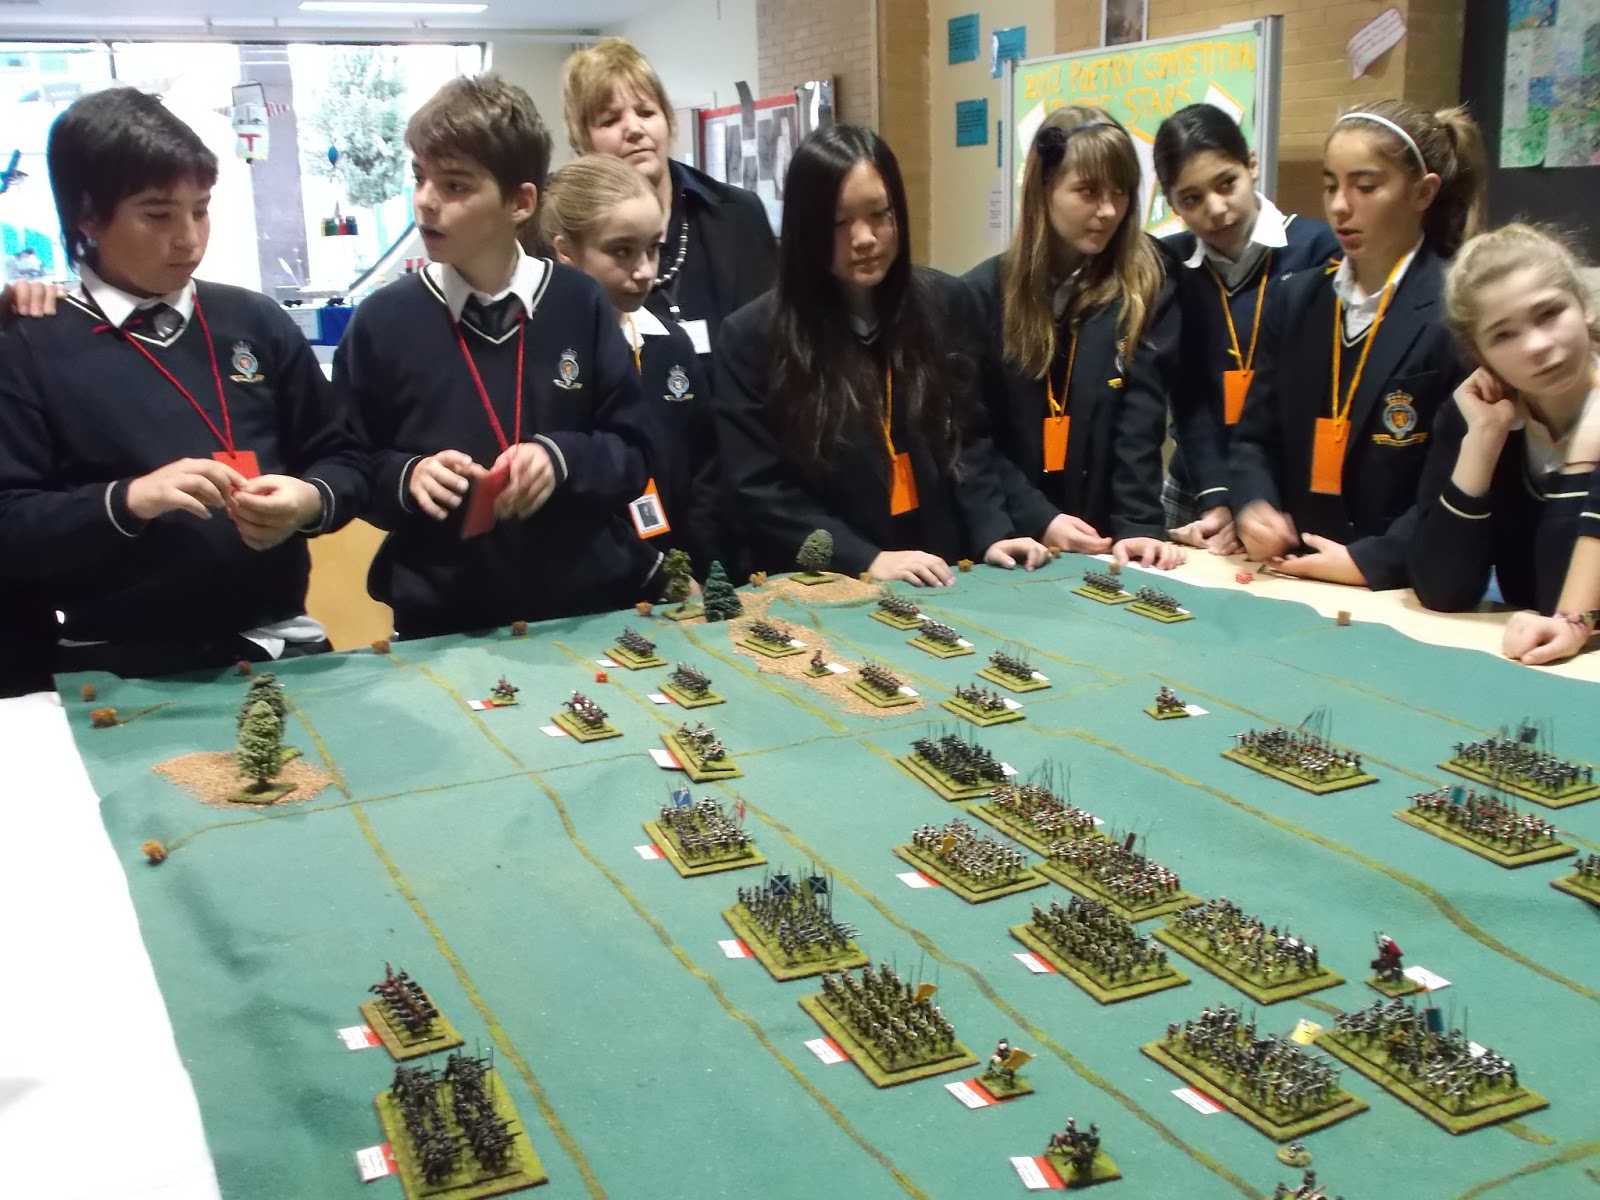
To help our secondary children in the school where I work to get to grips with history.  In the September I offered my wargaming services to the history department, they enthusiastically took up my offer and wanted me to organise battles for the English Civil War and World War One.  The objectives  I made myself was that the  game should be fun, fit into a single double lesson whilst attempting to have  23 pupils , boys and girls participating at the same time and hopefully they should learn something along the way.

 
Royalists commanders for the second game.
 
The first game was the first lesson on a Monday morning so an early start was needed to prepare the table. The rules used were based on the free wargame rules Marston less by Tony Cullen . These used a grid sytem so it was easier to for the pupils to understand movement. I changed the rules for command, each side had a general for each horse and foot line and also higher commands for the centre and each wing (Oliver Cromwell, Prince Rupert etc). Each Pupil therefore had their own command to look after. I used the bucket of dice system and when there was combat several pupils (supports, line and generals) involved were able to throw dice.

All the pupils seemed to be engaged and having a good time.
 
Each pupil had a card around their neck explaining which units they were in charge of during the game. These were also colour coded red and orange to explain which side they were on.

 
The Majority of the girls were on the Roundhead side
 
 On Monday we played the Royals actually won, after a see-saw infantry battle in the centre. The Parliament Commander-in-chief, Lord Fairfax was captured by the Royals when his second line was routed, although the Royals had lost their major General of foot Lord Astley when their front line had routed earlier on in the game. The cavalry on both wings were both engaged but without a decisive breakthrough on either flank.
 
 
The Royalist throwing their dice for combat, looks like the result was a good one.
 
For some reason I thought the lesson was ending at half past ten instead of eleven and so wrapped the game up with a royalist victory because parliment had  only 1  foot unit on the table. I was able to make up the time however explaining what actually happened in the battle, and taking charge of a healthy question and answer session, mainly about Prince Rupert and his dog.


King Charles (second boy to the left) taking advice fron his generals.
 
   On Thursday was the other Year 8 class, this time I was more prepared and like the first game, the majority of the girls went on one side (Parliament) and the boys the other side (Royalists). When I gave the command cards out I got the players with higher commands to stand up and I explained a little about their historical  lives. This group were a lot more cautious, (on Monday there were lot of shouts of Attack, attack) In the end I had to encourage the Royalists to move off there hill or both sdes would have stayed there all day looking at eachother.

 
Birdseye view of the action.

The cavalry under Rupert charged and the Royalist infantry advanced. The Parliament infantry charged down the hill to meey the Royalist line. When the first foot line were engaged in combat . King Charles finally decided (the boy playing Charles had the same charateristic of indecisiveness and listening to the last person who spoke.) to move into the melee to help reform the line. He was successful in removing the Disruption marker, but failed to fall back to safety. In the next combat resolution the Royalist line broke and the King was captured causing the whole of the Royal Army to be demoralised.

 
The Royalist Centre Command consider what to do next after losing their front line and the King.
 
On the right wing Prince Rupert cavalry had charged and due to the King being captured, they had an extra DP placed on his front line., This in turn meant his front line routed, Rupert managed to escape capture and retreat back to his second line.


            Another view from the gallery, I think at this time, I was explaining the importance of not moving your King into the combat area.

Prince Rupert charged with his second line but they were also routed and this time Rupert wasn't so lucky and was captured. Meaning Parliament had well and truly won the battle (and the war). I then explained what had actually happened and answered any questions they had. (one asked where he could buy the figures from and another asked about gaming World War 2).

 
A view from Parliament side, at this moment the Royalists still thought they had a chance of winning.
 
Afterwards I gave each Pupil a worksheet to choose another major battle, giving then four options Edgehill, Marston moor, Newbury and  Cheriton . They have to research it and write a scenario to play with the same board and rules. Then the best ones will be picked out to played hopefully in a few weeks time.  

Monday, 31 December 2012

Battle of Austerlitz

 
This was a game we should have played during the summer, but with one thing and another it was put on a back burner. I have always had a fascination with the Battle of Austerlitz and it was my first boardgame I ever brought when I was still at school. We played it similar to a campaign, when counters entered combat on the map, we transferred the game to the tabletop game in my bedroom. Like all campaign games though I don't think we ever ended it.
 
 
View from the French side before the Armies arrive.
 
For the table with it being Christmas I decided to go with the snowy look, however after laying the white cloth over the hills you couldn't really distinguish between the flat and raised parts. I had some some cork granules that they use in Spain to make Nativity scenes and spread this on the flats parts to represent the partly melted areas. The hills are left white to look like they have been covered in snow. This is a very cheap and effective way of modelling landscape that can be easily transported and reused for other battles.
 
To simulate the early morning fog I borrowed an idea fron the website of the Wargames Centre and had 3 levels.

 The first (Dense Fog) reducing visibility to 4BWs and also reducing movement to 4BW.

The Second (Fog)  visibility 6BWs and movement 4BW

The Third (Mist) visibility 10BWs and movement restricted to 6BW.

 
 The Pratzen was clearing on a 4,5,6. the areas North of the Pratzen on a 5,6, everywhere else on a 6. This is rolled after each defenders turn after movement and the visibility would improve by one level on the result of the one die roll.
 
Steuart had the honour of rolling for the weather but for the first few moves he rolled under 4 so there was no change, so we amended this rule in case we played the battle again. second roll add 1 to the dice, third roll add 2 to the dice and so on.
 
To simulate the forces not being able to see each other we used blinds to represent each unit. For this I used playing cards that were the same size as a 4 base unit and on the face side I stuck a small plastic bag that contained a small card with the units details. When units were spotted by enemy units they are turned over and replaced by the actual unit. I included 8 dummy blinds for the French and 4 for Coalition these represented mounted light cavalry scouts that could still able to spot and be mistaken by the enemy as units.
 
 
The French blinds are deployed
 
We had six players altogether, so myself, Jose and Steuart played the French side and Toni, Salva and Kiefer played the coalition. I was in control of the French left and commanded Lannes' V Corp and had the Cavalry Corp under Murat in reserve. Jose commanded the centre and had Soult's IV Corp with the Imperial Guard in reserve. Steuart held the French right flank with the I Corp and the Grenadier Division in reserve, also he had Davouts III Corp hopefully reinforcing him during the day. We also placed all our dummy blinds on the extreme right flank to hopefully make the enemy think there was a large force there.When we finished placing our blinds we left the room whilst the coalition placed their blinds.
 

                                                The Coalition Players deploying their ¨blinds"


The Coalition were classed as the attackers and moved first, we noticed that the forces facing Stueart was quite large, so we thought they may have believed our decoys. Steuart moved the dummy blinds as ordered over the frozen lake and on towards the village of Satschan. The weather was rolled and it was below the score needed so it was still dense fog.
 
 
The first units were sighted on my left flank where the French Infantry unit deployed in the village of Bosenitz spotted a Russian infantry unit supported by Cossacks emerging from some woods.
 
 
Also on my flank the Infantry in the village of Blasowitz found themselves surrounded by the Russian hordes, another French infantry unit caught in the open quickly managed to form square, before a Russian Dragoon unit could charge them.
 
 
In the centre, Jose quickly advanced the IV Corps on to the Pratzen heights and even took the village of Pratzen without resistance.
 
 
On my flank I realised by holding the villages my units were strung out and could not be all under command at the same time. Even though I still held the villages I felt they could fall at anytime and so I ordered Murat and the reserve cavalry forward to push the Russians back.
 
 
The view of the whole Battlefield from the French left flank.
 
 
On the French right flank our little ruse with dummy blinds had been discovered and Steuart was forced to retreat over the frozen Lake. It was now discovered that he was up against the Russian Imperial Guard and still no sign of Davouts III Corp.
 
 
French and Russian Infantry face each other over the frozen lakes of Satschan.


               Murats Cavalry charge starts to get stalled due to lack of space to manouvre and the village of Blasowitz  falls to the Russian troops under Toni.


A view of the French left flank from the Coalition side. The village of Baseonitz against all odds is still holding and the French Artillery on the Santon (in the centre of the photo) rain hot lead on the Russian infantry attacking it.

 
Finally the French are driven out of Bosenitz and the Coalition forces begin to outflank the Santon.


   In the centre there is still heavy fighting with the French Imperial guard being thrown into the battle on the right hand side.


Finally Murat's Cavalry begin to make a breakthrough.
 
 
Also Davout's III Corp finally arrives on the French right flank but has a hard job on its hand, because Salva's Russians have  begun to outflank them.
 

                                   Murat's cavalry push the Coalition forces further back and threaten to                 breakout, although Toni still has a few cavalry units still in reserve.


      With the Russian artillery bombarding it from the flank "The Santon" has finally falls.


As the "Sun of Austerlitz" begins to set it comes evident that even though the French are holding its own in the centre on the Pratzen heights, there are no more reserves to throw in and take advantage of the position.


The Russian Imperial Guard now begins to support its allies on the Pratzen Heights and finishes off the last of the French Imperial Guard and with it the hope of a French victory.

Conclusion

This was a very enjoyable game with the players wanting to play it again another time. There were a few things I would have done differently. The fog due to steuart's low rolling wasn't changing and so we changed the rules after a few moves to keep adding +1 each time we rolled. We had used the Lasalle rule of throwing for the commander's vigour and Tactics that gave very disappointing results for the French, in hindsight for game balance it would probably be better to start the French commanders on fixed +1 and just roll for the Coalition Commanders.

The command rule for Lasalle made it difficult to have everybody under command at the same time on a large table. An idea for next time is for and deployed units in villages to be  classed as independent units and they may take the recovery test, also they are classed as under command in combat.

 I also found the blind rule worked very well and will definitely use it again and will incorporate it in my "Gettysburg rules".

Special thanks goes to Juan Marcos and Miguel for lending us some of their figures even though they could not make it, hope you both  will be able to join us next time we play.

Special Rules

Fog

Visibility is set with three levels,

 The first (Dense Fog) reducing visibility to 4BWs and also reducing movement to 4BW.

The Second (Fog)  visibility 6BWs and movement 4BW

The Third (Mist) visibility 10BWs and movement restricted to 6BW.

 The Pratzen was clearing on a 4,5,6. the areas North of the Pratzen on a 5,6, everywhere else on a 6. This is rolled after each defenders turn after movement and the visibility would improve by one level on the result of the one die roll +1 each time roll accumulative until the fog clears automatically.

Deployment

French Deploy First, they may deploy upto the town of Pratzen. The Russians Deploy second 8BWs from their side. To simulate fog each side uses Blinds when they are spotted by the enemy they are replaced by the actual units.

Davouts French 3rd Corp is a reserve and will appear as in normal Lasalle rules. At a predetermined point on the board.

Each army has a number of dummy blinds that can be used to confuse the enemy when spotted they are removed.

Special Rules

Generals and commanders can only move up to  12BWs in any direction.

Limbered artillery can not on  purpose move within 4BW of an enemy unit.

Streams and lakes are frozen and units may move across them with out penalty, however artillery may bombard lakes if the lake receives 10 or more hits, the ice is broken. If any units were on the lake when the ice broke they are considered lost and the lake is considered impassable.

Austrian and Russians must use the Linear tactics:

Infantry in Attack Column may not charge and all units require their full movement allowance to change formation, regardless of what formation they are in.

Victory Conditions

Either the destruction of an Army or at the end of the game total up the points of each town that is controlled by either side (They must have a unit deployed or occupying the town area). The Side with the most points wins.

 Order of Battle
 
French Order of Battle

Commander  Napoleon

Imperial Guard   Marshal Bessieres Command Range 6BWs

2 Guard Units Valiant/Experienced/SK2/Guard
1 Old Guard Cavalry  Valiant/Experienced/Guard/Shock
1 Horse BTY 2 cannon/1 How Medium

I Corps  Marshal Bernadotte Command Range 8BWs

7 Veteran Inf Units Reliable/Experienced/SK2
Reserve BTY   3 cannon/1 How  Heavy

III Corps Marshal Davout Command Range 6BWs

2 Veteran Inf Units Reliable/Experienced/SK2
1 Dragoon  Unit  Reliable/Experienced/Pursuit.
1 Light Horse BTY 2 cannon/1 How Light

IV Corps  Marshal Soult Command Range 14BWs

10 Veteran Inf Units Reliable/Experienced/SK2
1 Chasseur Unit   Reliable/Experienced/Pursuit
1 Hussar Unit    Valiant Experienced/Pursuit
Reserve BTY   3 cannon/1 How  Heavy
Horse BTY     2 cannon/1 How  Medium

V Corps  Marshal Lannes Command Range 7BWs

6 Veteran Inf Units Reliable/Experienced/SK2
1 Hussar Unit    Valiant Experienced/Pursuit
1 Division BTY  3 cannon/ 1 How  Medium

Grenadier Division  General Division Duroc Command Range 6BWs

3 Elite Inf Units  Valiant/Experienced/SK2

Cavalry Reserve  Marshal Murat Command Range 8BWs

2 Cuirassier (+) units  Valiant/ Experienced/Shock
2 Dragoon units  Reliable/Experienced/Pursuit.
2 Hussar units    Valiant Experienced/Pursuit
2 Horse BTY   2 cannon/1 How  Medium

3rd Coalition Order of battle

Commander  General Kutusov

Russian Imperial Guard  Grand Duke  Constantine Command Radius 10 BWs

4 Guard Infantry units Valiant/Experienced/SK1/Guard
4 Guard Cavalry  units Valiant/Experienced/Shock/Guard
1 Position BTY 4 Cannon/1 How Heavy
1 Horse BTY 3 Cannon/2 How Med

Advance Guard Russian Army  Lt Gen Bagration Command Radius 11 BWs

2 Jager Units  Reliable/Exp/SK1
3 Musketeer Units  Reliable/Exp/SK0
1 Cuirassier Unit   Valiant/Experienced/Shock
1 Dragoon Unit   Reliable/Experienced/Pursuit
1 Hussar Unit  Valiant/Experienced/Pursuit
1 Cossack Unit   Shaky/Irregular/Pursuit
1 Light BTY 4 Cannon/1 How Med
1 Horse BTY 3 Cannon/2 How Med

Advance Guard of Gen Buxhowden Marshal Von Keinmayer Command Radius 6BWs

2 Grenz Units  Valiant/Amatuer/SK2
1 Austrian Hussar Unit  Valiant/Experienced/Pursuit
1 Austrian  Uhlan Unit   Reliable/Experienced/Pursuit/Lancers
Cavalry BTY Horse 2 cannon/1 How Med

First Column   Lt Gen  Dokhturov Command Radius 9 BWs

5 Musketeer Units  Reliable/Exp/SK0
1 Grenadier Unit  Valiant/ Experienced/ SK0
1 Cossack Unit   Shaky/Irregular/Pursuit
1 Horse BTY 3 Cannon/2 How Med
1 Position BTY 4 Cannon/1 How Heavy

Second Column  Lt General Langeron Command Radius 8 BWs

1 Jager Unit  Reliable/Exp/SK1
4 Musketeer Units  Reliable/Exp/SK0
1 Grenadier Unit  Valiant/ Experienced/ SK0
1 Dragoon Unit   Reliable/Experienced/Pursuit
1 Horse BTY 3 Cannon/2 How Med

Third Column  Lt Gen Przebyszewski Command Radius 6 BWs

1 Jager Unit  Reliable/Exp/SK1
3 Musketeer Units  Reliable/Exp/SK0
1 Horse BTY 3 Cannon/2 How Med

Fourth Column  Lt Gen Kollowrat Command Radius 6 BWs

4 Austrian Infantry Reliable/Experienced/SK1
6 Russian Musketeer Units  Reliable/Exp/SK0
1 Grenadier Unit  Valiant/ Experienced/ SK0
1 Austrian BTY Horse 2 cannon/1 How Med
1 Position BTY 4 Cannon/1 How Heavy

Fifth  (Cavalry) Column Lt Gen Liechtenstein  Command Radius 6 BWs 

2 Austrian Cuirassiers units (+)   Valiant/ Experienced / Shock
1 Russian Dragoon unit   Reliable/ Experienced / Pursuit
1 Cossack Unit   Shaky/Irregular/Pursuit
1 Austrian BTY Horse 2 cannon/1 How Med