Friday 15 July 2011

Battle of Intombe

The Battle of Intombe

With Jose coming over to my house for a return match. I said I would put on a Colonial game. We have started to play "The Sword and the Flame" rules and so I started to look for a good game to put on, to rekindle our interest. Looking through my books I realised an interesting game could be made from recreating The Battle of Intombe.
Less famous than the actions at Rorkes Drift and Isandhlwana this battle still has everything, British Soldiers being massacred, Heroic deeds such as Sergeant Booth being awarded the VC for forming a rearguard, Supposedly cowardly acts, Lt Harvard deserting his command to fetch help and one of the great quotes of the war by Capt Moriarty saying "I’m done, Fire away boys".
This meant rebasing all my Zulus as the rules for TSATF work better on single bases. My Idea is to base them singularly on 2 cent pieces and then put 10 figures onto a magnetic base, so they can be moved around easily. With having collected over 400 Zulus over the last few years, this isn’t going to be an overnight job.
Although some contemporary account exaggerate the number of Zulus in the battle, most seem to say it was around 800, so I set the figure ratio to 2 men = 1 figure. The Zulus were organised 9 fig units with 1 leader. I know in TSATF it should be 20, but with still not being able to mark the bases correctly, it was the easiest way to manage a large Impi. The British were organised in 10 man units as well.

Order of Battle

Zulu

40 units of 10men

British

Capt Moriarty
Lance Segt Johnson Platoon of 10 men
Lance Segt Sansam Platoon of 10 men
Corporal McCoy Platoon of 10 men
3 Civilians
Civil Surgeon Cobbin

Lt Harvard
Segt Booth’s Platoon of 10 men
Segt Etherington´s Platoon of 10 men


The Battle site, Captain Moriarty´s force are on the North bank of the river Intombe sleeping soundly in their tents. On the south bank Lt Harward´s force is encamped in two tents.


A close up of Capt Moriarty´s camp, his tent is front of the wagons out of the mud. A sentry keeps watch between the wagons.

3.30 a.m The sentries on the South Bank hear a gun shot,

Lt Harward calls all his men to stand to and sends a messenger to Capt Moriarty. For some reason Capt Moriarty doesn´t call his men out to stand to and goes back to bed.

Around 5.00 a.m through the mist the sentries spot a huge mass of Zulus advancing onto the camp.


Some of the men were up in a moment. But over half are still in their tents collecting their rifles etc. Capt Moriarty opens his tentflap in a bad temper due to being waken the second time tonight. Just then the zulus fire a volley killing one soldier.


Captain Moriarty and the sentry next to his tent, Pvt Dutton , face the hordes of Zulus alone, as all his platoons decide to retreat to the southern side of the river.


The head and loins of the zulu formation crash into the camp, Lt Harwards force moves forward to give covering fire as Lance Segt johnson´s platoon reaches the river.

On the farside of the camp Pvt Hodges acts as rearguard whilst Corporal McCoy´s Section reaches the riverbank.


Capt Moriarty kill two Zulus with his revolver before being beaten back and then killed in close combat. Pvt Dutton retreats back to the wagon.


The Zulus catch Coporal McCoys platoon and after stiff resistance kill all the men apart from Pvt Hall who being a good swimmer manages to swim across the river.

On the other side of the camp Lance Segt Johnson´s platoon jump into the river, 4 soldiers drown in the deep fast waters including Lance Segt Johnson. With the Zulus hot on their heels Lance Segt Sansam´s Platoon also dive into the river and also Lance Segt Sansam is drowned, so both platoons are now leaderless.


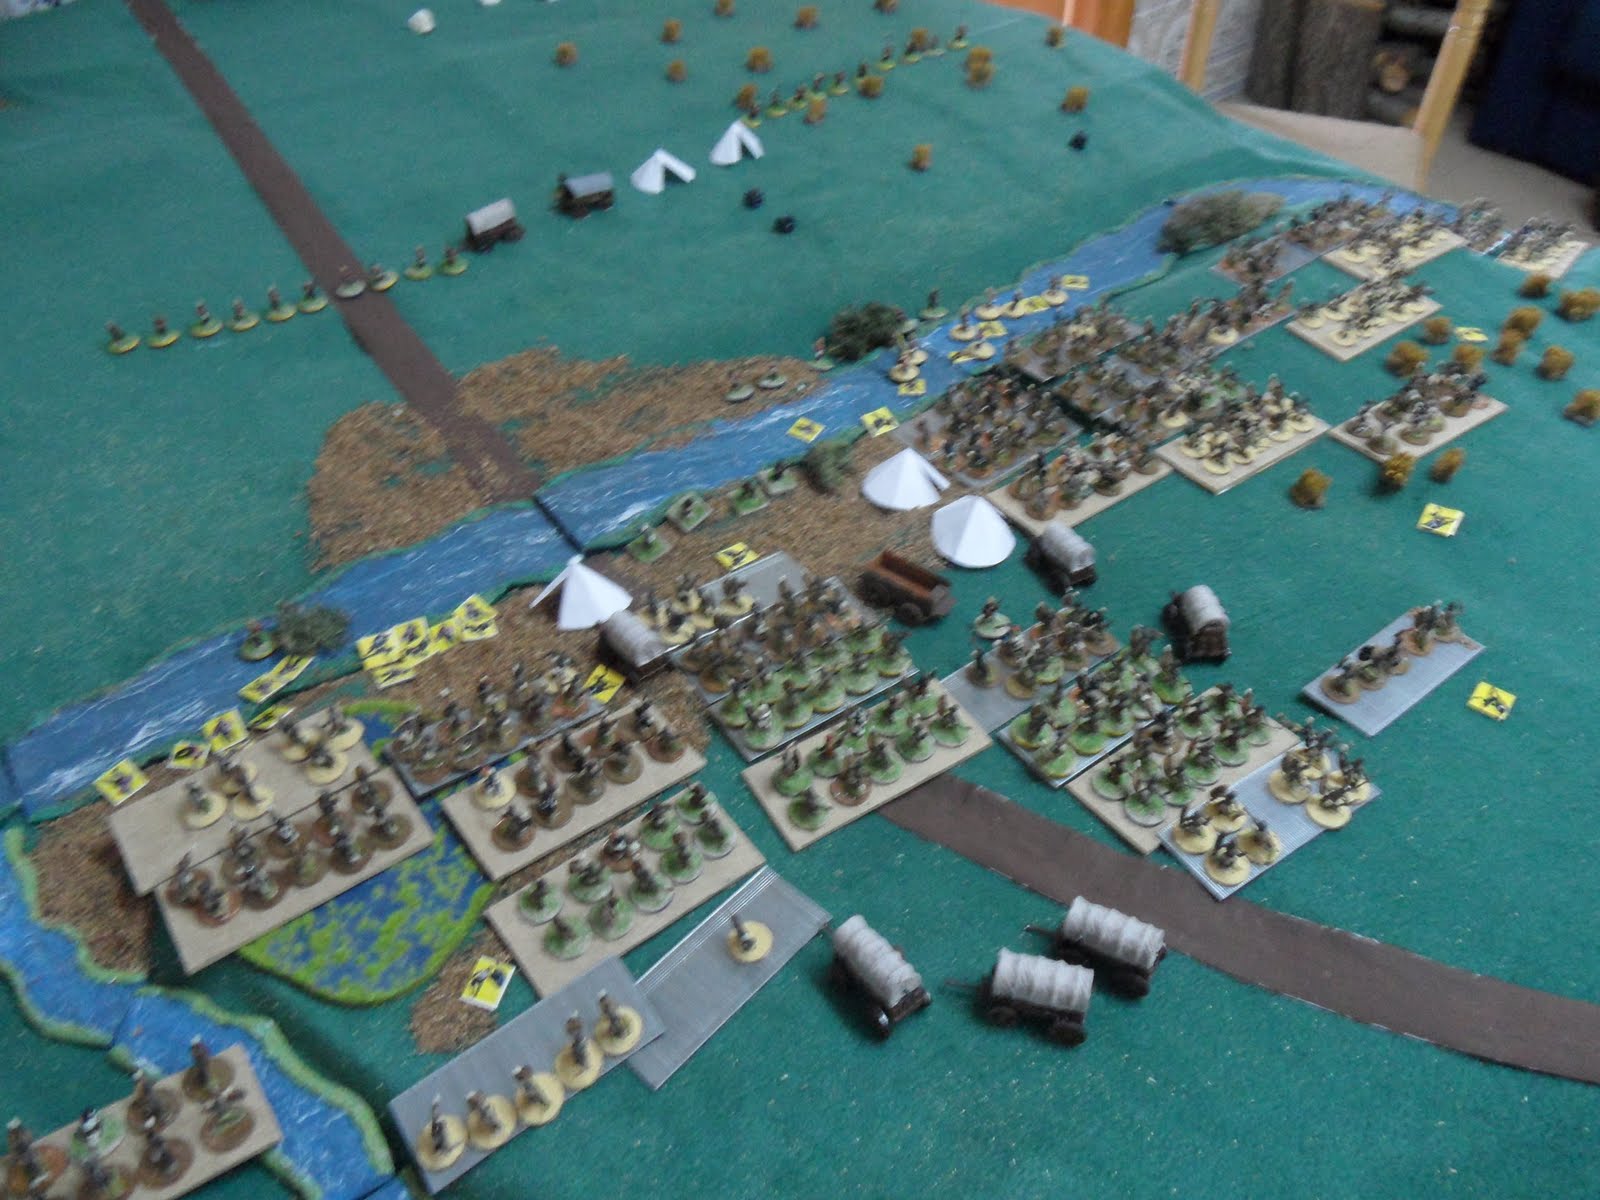
Lt Harward´s force gives covering fire to their comrades who are swimming for their lives across the river.


The civilians are caught in the ford by the Zulus, Surgeon Cobbins drowns in the river before the Zulus arrive. The remnants of Lance Segt Johnson´s Platoon make it to the far bank of the river and move towards Lt Harward´s force. Lance Segt Sansam´s platoon reach the far bank.


After killing the civilians in the river. The Zulus begin to cross the ford

The Zulus cross the river to attack Lance Segt Sansam´s Platoon.


Seeing the situation as hopeless and not wanting to get involved with the Zulus at close combat, Lt Harward orders both of his platoons to march towards Luneberg.


But Sansam´s platoon are still fighting for their lives on the river bank.


They manage to beat the zulus in front, but there are only 3 of them left and more Zulus have crossed the river either side of them.

The Zulu turnaround and fall onto the survivors killing 2 the only one that survives is Pvt Harper with the colours. He retreats back into the river and is drowned with the colours floating downstream in true "Zulu Dawn" fashion.


The Zulu Army win with all the camp and supplies in their possession. There are a few British survivors from the North Bank, five from Lance Segt Johnson´s and only Pvt Hall from Corporal McCoy´s Platoon. Lt Harward didn´t cover himself in glory, he might have saved his command but didn´t wait for the survivors to catch up with him and will probably face an inquiry.

Conclusions

This was a fun game to play, the rules worked well. With using 15mm figures I was going to half the movement in inches, but Jose´s tape measure was only in cm´s so we decided to substitute cm´s for inches. This made the Zulus move a little slowly than I anticipated, and due to Jose, who was playing the British, not putting up much of a defence. I thought the British may have reached the South Side of the river more or less intact.
Because the Zulus were attacking we counted all hits on them basically as kills to keep the record keeping down. There wasn´t any Regimental Colours at the battle(as far as I know) this part was purely fiction on my part. I think my next game may be Isandhlwana if I can finish painting my British.

Friday 8 July 2011

Battle of Sabugal

On Thursday I went over to Jose´s house to play a couple of games. The first was a recreation of the Battle of Sabugal. When Wellington tried to trap Massena´s retreating troops with a flanking manouvre. However the weather was pretty awful with thick fog and sporadic rain showers. Most of the British Brigades decided to halt apart from the Light Division which got lost in the fog and ended up taking on most of the French IInd Corps.

Order of Battle

British C-in-C Wellington

Light Division Erskine

Beckwith´s Brigade: 1 Brit Inf(+) 1 Cacadores, 1 Rifles Elite, RH Artillery

Drummond´s Brigade: 1 Brit Inf(+) 1 Brit Inf, 1 Cacadores, 1 Rifles Elite

Cavalry Division Eskine

Slade´s Brigade: 1 Dragoons, 1 Light Dragoons

Arendtschildt´s Brigade: 1 Hussars, 1 Light Dragoons

3rd Division Picton

Mackinnon´s Brigade: 3 Brit Inf, 3 SK bases

Colville´s Brigade: 4 Brit Inf

Power´s Brigade: 4 Portugese Infantry

1 RA Medium

5th Division Dunlop

Hay´s Brigade: 3 Brit Inf, 1 extra SK base

Dunlop´s Brigade: 3 Brit Inf, 1 extra SK base

Spry´s Brigade: 4 Portugese Infantry, 8th Cacadores

1 RA Medium

French C-in-C Reyneir

1st Division II Corps Merle

Sarrut´s Brigade: 5 French Veteran Infantry

4th Legere (not brigaded): 2 Veteran Infantry

1 Division Foot Artillery

2nd Division II Corps Heudelet

Arnaud´s Brigade: 6 French Veteran Infantry

Godard´s Brigade: 4 French Infantry

1 Division Foot Artillery

Cavalry Brigade: Soult 1 Hussars, 1 Dragoons, 1 Chasseurs

British

AHearts ASpades Beckwiths Brigade

2Hearts 2Spades Drummonds Brigade

3Hearts 3Spades Mackinnon Brig

4Hearts 4Spades Colville Brig

5Hearts 5Spades Powers Brig

6Hearts 6Spades Hays Brig

7Hearts 7Spades Dunlop Brig

8Hearts 8Spades Spry Brig

9Hearts 9Spades Slade Brig

10Hearts 10Spades Arendtschildt Brig

French

ADiamonds AClubs Sarrut Brig

2Diamonds 2Clubs 4 Leger

3Diamonds 3Clubs Arnaud Brig

4Diamonds 4Clubs Godard Brig

5Diamond 5Clubs Soult Brig

Deployment

The French player places the playing cards face down on the table in his deployment zone. The red cards are the actual positions and the Black cards are dummy cards. When an Actual British force come within visibility range of the Card then the player must turn it over. The French Player may move a card only to reinforce another force that is under attack. However this force may become lost in the fog throw D6 if the force they are reinforcing cannot be seen throw 1D6 1-2 moves 45deg to their left 3-4 move straight ahead 5-6 moves 45degrees to their right.

On turn 1 Beckwith´s Brigade enters the field. At the 2 possible points shown on the map. On turn 3 For Drummond brigade use 1D6 instead of 2D6 as per normal reserve rules.

The British player Dice each turn to see if any of his commands enter the board as normal reserve rules. There are 2 possible routes that each brigade can enter. Place both cards on the table they can move 4BWs a turn throw 1D6. 1-2 moves 45deg to their left 3-4 move straight ahead 5-6 moves 45degrees to their right. When one reaches a French card or Force then throw dice 1-3 it is the dummy force. 4-6 it is the actual force. If it is the dummy force then the French don’t have to show their card. If it is the actual force then they are placed on the board in march formation. It is assumed the French dummy cards are small groups of pickets or skirmisher, who send word back to their parent formations of the British whereabouts.

British Cavalry only have one card but if it is turn out to the dummy card then Erskine, their commander, has taken them to far north and they wont turn up on the battlefield

Weather

At the start of the battle the weather was Bad fog, at the start of every turn throw 1d6 if result is a 1 the weather worsens and drops down a step. Result of 5 or 6 means weather improves and goes up 1 step if it reaches the top step clear then the weather to full visibility.

Step 1 Clear no rain normal condition apply

Step 2 Mist visibility 12Bws

Step 3 Fog visibility 8BWs

Step 4 Bad Fog visibility 4BWs

Step 5 Bad fog and rain only visibility 2BWs effects of rain on firing apply

There are 25+ Moves, British go first.

Normal Breakpoints rules only apply if/when the weather has cleared for the Generals to see the state of their troops.

Objective: The British objective is Reyneirs HQ which is situated at the back of the table in the middle.


Turn 1, The French positions are placed on the ridge although half the cards are false. Bottom right are the 2 cards representing the 2 possible positions of Beckwith´s Brigade of the Light Division.

The right hand card advanced within 4Bws of the first French card. The British card turned out to be a dummy, so we knew the card next to the stream running into the river coa was Beckwith´s brigade and so I placed the troops in March formation.

The brigades of the British 3rd or 5th Division start to enter the Battlefield. On the French far left flank Drummonds Brigade enters and Beckwith´s Brigade stumbles into the woods.

Hay´s Brigade of the 5th Division advances up the ridge and is spotted by the French pickets.


Dunlop´s Brigade of the 5th Divsion is also spotted by the French Pickets, but still no sign of the French main force.

The Light Division converge on top of the ridge and through the fog and spot a French Artillery Battery. Just then a 1 is thrown for the weather and the visibilty is cut 2 Bws and it starts to rain.

The Brigades of the 3rd and 5th Divisions carry on advancing blindly up the ridge. In the top right of the picture you can see the French manouvering to face the Light Division.

The French catch the Light Division before it can deploy and a French Unit charges a rifle unit in the flank. Luckily due to the heavy fog the French artillery cannot see any targets.

The first brigade of the 3rd Division march straight into the French central positions.


The 5th Division carries on marching over the ridge, not knowing that there are no enemy troops in front of it.


Just then the French right flank attacks the British 5th Division. A French Chasseur unit charges a British infantry unit still in March column.


Meanwhile, in the center French Dragoon ride straight over a British unit and another British unit is broken by French Infantry. Only 1 unit is left of Mackinnons Brigade and they are in serious trouble.

The British 5th Division fair better and beat off the French attacks


The 5th Division with their Portugese Brigade in support counterattack the French line.

Power´s Portugese Brigade of the 3rd Division get lost in a wood and comes up on the French Left. The Light Division press their attack on the French to their front.


A Portugese unit advance unto the flank of a French unit and breaks it. The British Cavalry are still lost and have not appeared. The British centre is in trouble with one Brigade totally destoyed and the other one totally lost last seen marching off the right of the battlefield.

The game ended here on turn 24, due to the fact although the British were holding there own on both flanks the centre was doomed and the French would be able to split the British in two. Also it was hot day (36 degrees) and we wanted a dip in the pool before lunch.

Conclusions

This was an interesting Battle to play, Jose who was playing the French concentrated his forces in the centre. Which meant quite a few game turns went by before the French Army was discovered. The weather was awful all the way through the game and spoilt the game play a little, as we kept throwing lots of ones and only one six. So I have changed the improvement of the weather on a 5 or 6 for next time. The card movement worked well but maybe an option would be for the British to be able to deploy out of march formation when discovering a dummy card.

Thanks again to Jose and his family for making me feel so welcome.

Phil

Monday 4 July 2011

Battle of Aspern Essling

Refight of the Battle of Aspern Essling

Hooray, summer holidays are finally arived, and to start it off in grand style we fought the Battle of Aspern Essling at my local club in Alicante. This was our largest battle we played with Lasalle to date, we also had our best turnout with nine players turning up. The order of battles were as follows:

Austrian Army
C-in-C Archduke Charles

1st Column, Baron Hiller

1 Hussar unit, 4 Heavy Cannon, 2 Infantry units (+), 2 Landwehr units, 1 Grenzer Unit.

2nd Column, Bellegarde y Vogelsang

1 Chevaulegers, 3 medium cannon + 1 howitzer, 6 Infantry Units(+), 1 Infantry unit.

3rd Column, Hohenzollern y Weber

3 Heavy Cannon + 1 Howitzer, 5 Infantry Units(+), 1 Infantry unit, 1 Landwher, 1 Jager.

4th Column, Dedovich

1 Uhlans, 1 medium cannon + 1 Howitzer, 1 Infantry Unit(+), 2 Infantry units, 1 Landwher, 1 Grenzer.

5th Column, Hohenloe

1 Hussars, 2 Medium cannons and 1 Howitzer, 3 Infantry(+)

Reserve, Liechstenstein with the resrve Cavalry and Lindenau with the grenadiers.

1 Hussars, 1 Dragoons, 1 Cuirassiers(+), 3 Heavy cannon, 5 Grenadiers.


French Army

C -in - C Napoleon

Imperial Guard: Dorsenne

1 Guard Cavalry, 2 units of Young Guard, 2 units of Old Guard,

2nd Corp Lannes y Claparede

9 Veteran Infantry, 2 Elite Infantry, 1 Elite Light Infantry, 3 medium cannon + 1 Howitzer.

4th Corp Massena, Lassalle(with the cavalry), Legrand y Saint Cyr

2 Hussars, 1 Chasseurs, 12 Veteran Infantry, 2 Elite Infantry, 1 Elite Light Infantry. 3 Cannons + 1 Howitzer.

Reserve Cavalry Bessieres

3 Cuirassiers, 1 Horse Artillery(2 cannons + 1 Howitzer)


Special Rules for the Battle


The Terrain is dry and no rain

Turns 30

The French move first.

The units of Lannes must be directed to Essling and Massen´s units to Aspern.

Rule 1 Cavalry Charges

Cavalry halve dice in close combat if they are considered to be in woods or rough terrain.

Rule 2 Napoleon

Napoleon can repeat all throws of recuperation for all units within 4 BWs or 2 BWs if seperated by buildings.

Rule 3 Old Guard

Units of the Old Guard including cavalry cannot be seperated more than 6 BWs from Napoleon.

Rule 4 Young Guard

The 2 units of Young Guard can be put under the command of another General. This can happen only once during the game and the 2 units must go together.

Rule 5 Artillery

Foot Artillery limbered can only move 4 BWs

Horse Artillery Limbered can only move 8 Bws

Artillery can´t unlimber if it has moved fully.

Rule 6 Squares

Foramtions in square can fire 1 dice per side simulteanous.

Rules 7 Mass Battalions

Mass Battalion throw 4 dice instead of 2 against Cavalry.

Rule 8 Assault French Columns

Formation of French March Column are called assault columns.

They can fire 1 Dice to the front.

They can charge, half dice in close combat, only from a distance of 4 BWs.

Rule 9 Generals

The rules for General is the first General (in Black bold) is in command of the whole of that command the subordinate generals can only command a part of the command.

In case of Napoleon and Archduke they both can command any part of their armies.

Rules 10 Rules of command

All the Generals and the messengers can move 15BWs per move.

During the battle Players can not discuss their orders or strategy with other players.

1st Meeting: Before Placing the units each side can meet for 10 minutes to talk tactics etc. The C-in-C has the final word. The Players have their initial orders written out:

In turns 9 and 10, 15 and 16, 25 and 26 orders can be changed.

To change an order you must move a messenger from the C-in-C to the recieving general. The messenger cannot move near the enemy.

If the C-in-C is the next to another General then they can talk directly.

2nd Meeting: After lunch each side can meet for 10 minutes to discuss the battle.

Value in Points

Church of Aspern

5 Points

Town of Aspern

2 Points for each square

Mill of Essling

10 Points (all or nothing (2 squares)

Town of Essling

2 Points for each square

Brick Factory

5 points

Pontoon over the Danube

20 Ponits to Austrians

Each enemy unit eliminated

1 Point

Deployment

French Player

The French will introduce the following units from the pontoon over the Danube.

From turn 1

CE DE MASSENA.- 1 Veteran, 1 Elite, 1 Light Elite

All of Lasalle´s Cavalry.

CE DE LANNES.- 1 Veteran, 1 Elite, 1 Light Elite.

BESSIERES.- 1 Cuirassiers.

Entry of Reinforcements:

In each French turn, the player throws 1D6. The result determines the number of units that enter that turn.

If the result is 3,4 or 5 then the Austrian Player can throw a 1D6 if it is superior then the the number of french units is reduced by 2.

By turn 20 the French have built a more solid bridge and are able to bring 4 units at a time. There is no more throwing of dice.

Austrian Player


To try to simulate the lack of cordination of the Austrian Columns arriving on the battlefield. Each Austrian column need to throw a 1D6 to enter the Battlefield.

Turn 2.- Enter if score 5 or 6

Turn 4 Enter if score 4,5 or 6

Turn 6 .- Enter if score 3,4,5 or 6

TURNO 8.- Enter all columns that havn´t already.


The empty Battlefield at the start. The town of Essling with the great Mill is in the foreground and Aspern is in the Background.

I was given the role of Lannes in command of the 2nd Corp. I had orders to take and hold the town of Essling. My first 3 units were deployed into the town and hopefully my reinforcement are able to cross the pontoon bridge.
The French Centre with Napoleon in the middle with his entourage.

The town of Aspern with Massena´s vanguard deploying in the buildings and behind the walls.


Hooray, my first reinforcements begin to arrive marching down the road to Essling with General Claperede at the front hurrying them along.


Sacre bleu! Each Austrian Column needed to throw a 5 or 6 to appear on the battlefield. Each player apart from Toni (sitting despondently in the centre) threw a 5 or 6. We were surrounded as soon as the battle had begun. Miguel can be seen as a blur to the right of the screen, quickly getting more Austrian troops, as if there wasn´t enough on the table already.

The Austrians quickly march onto Essling with cavalry support .

On the French left flank . Miguels Austrians make a flanking move around the town of Aspern.


The first assault of many on the town of Essling. Whilst the Austrian cavalry charge my square. Both attacks fail, thanks to my Generals superior tactics.


More reinforcements coming to my aid. But they aren´t comimg quickly enough and I ask Napoleon for some cavalry, but he refuses my request.

Toni grinning now his troops have finally entered the battlefield


Another assualt on Essling whilst an Austrian Infantry tries to perform a flanking manouever.

The French Cavalry are building up strength in the centre, but are now being threatened by Miguel´s Cavalry comimg from behind Aspern.


Lannes artillery has finally arrived and deploys to the left of Essling.

The first assaults comence on Aspern.

The Austrian advance starts to slow down as it moves into the rough and marshy ground.

A quick view of the whole battlefield, bottom right you can see the Austrian reserves advancing.

My heroic Elite light Infantry have finally been overwhelmed with 3 Austrian units attacking.

In the next move my troops countercharged and took back the lost ground.

The pontoon bridge has finally been repaired fully and 6 units are able to cross in one move, the French are ready to start their own offensive.

The Austrian Infantry give up on direct assaults on the south of Essling and are content with a musketry duel instead.


The Young guard enter Essling to reinforce their beleagured country men, whilst the Austrian Hussars try again to charge a square.


Now the Austrian turn their attention to the north of Essling and start to assault it in strength.


At the top you can see some French cavalry breaking up an attack on the Mill, but the Austrian Grenadiers are preparing to attack.

More French Troops are marching up the road to Aspern but now it is nearly all in Austrian hands.

Austrian cavalry try to break through the French centre, but the Old Guard stand firm and I send Claparede with four infantry battalions to help out. This would be a mistake on my part because I was confident that Aspern would hold out and I didn´t need any more units.

The Austrians take the North part of the Mill


I manage to countercharge and regain the North part of the mill, but this would be my downfall as the Austrian pour into the void before I can move any more units into the town.

Aspern is well and truly in Austrian hands and thr French assault bogs down.

On turn 24 I have a last attempt to regain control of Essling but my attack is easily beaten back and the game ends with the Austrians being the victors.

Conclusions

Thanks again to everybody for making this an enjoyable day, especially Javier for organising and supplying the magnificent models of the Mill and the church. At the beginning all seemed lost from the start as the Austrians were lucky in their throwing of dice. Maybe it would have been better to start with 6 instead of 5 or 6 for Austrian Column entry. Also I think for French reinforcements only throwing for the French would have been sufficient, without the Austrians throwing to restrict the French units even further.
Heres to the next Battle which will hopefully be Wargram which is going to be a marathon, cant wait.